nvm (Node version Manager) 로 여러 버전의 nodejs 사용하기
nvm은 node js 버전 매니저로 시스템에 여러 개의 nodejs 를 설치하고 사용할 버전을 쉽게 전환할 수록 도와주는 shell script로 rvm(Ruby Version Manager) 와 비슷한 역할을 수행합니다.
사전 준비 사항
만약 시스템에 nodejs 의 바이너리가 설치되어 있지 않다면 C++ 컴파일러와 개발 라이브러리 설치가 필요합니다.
Ubuntu 에 개발 툴 설치
sudo apt install build-essential libssl-devRHEL 에 개발 툴 설치
sudo yum install gcc gcc-c++ openssl-devel설치
설치 스크립트를 받아서 실행하면 되는데 curl 또는 wget을 사용하면 됩니다.
curl 로 설치
curl -o- https://raw.githubusercontent.com/nvm-sh/nvm/v0.35.1/install.sh | bashwget
wget -qO- https://raw.githubusercontent.com/nvm-sh/nvm/v0.35.1/install.sh | bash위 명령어를 실행하면 아래와 같은 메시지가 표시됩니다.
=> Appending nvm source string to /home/lesstif/.bash_profile

=> Appending bash_completion source string to /home/lesstif/.bash_profile
=> You currently have modules installed globally with `npm`. These will no
=> longer be linked to the active version of Node when you install a new node
=> with `nvm`; and they may (depending on how you construct your `$PATH`)
=> override the binaries of modules installed with `nvm`:

/usr/local/node-v6.17.0-linux-x64/lib
├── gulp@4.0.0
=> If you wish to uninstall them at a later point (or re-install them under your
=> `nvm` Nodes), you can remove them from the system Node as follows:

     $ nvm use system
     $ npm uninstall -g a_module

=> Close and reopen your terminal to start using nvm or run the following to use it now:

export NVM_DIR="$HOME/.nvm"
[ -s "$NVM_DIR/nvm.sh" ] && \. "$NVM_DIR/nvm.sh"  # This loads nvm
[ -s "$NVM_DIR/bash_completion" ] && \. "$NVM_DIR/bash_completion" # This loads nvm bash_completion맨 아래에 있는 메시지를 보면 shell 의 초기화 파일(ex: .bash_profile) 에 다음 내용이 추가되었으므로 source ~/.bash_profile 를 실행하거나 다시 로그인하면 nvm 설치가 반영됩니다.
export NVM_DIR="$HOME/.nvm"
[ -s "$NVM_DIR/nvm.sh" ] && \. "$NVM_DIR/nvm.sh"  # This loads nvm
[ -s "$NVM_DIR/bash_completion" ] && \. "$NVM_DIR/bash_completion" # This loads nvm bash_completion목록 보기
ls
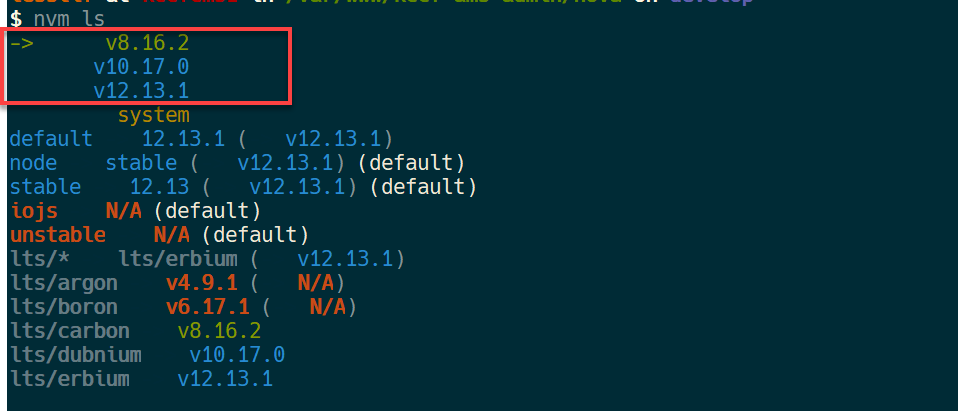
현재 local 에 설치된 node 목록을 확인할 경우 ls 옵션을 주고 실행하면 됩니다.
$ nvm ls
local 내 전체 목록이 표시되며 → 표시가 있는 v8.16.2 가 현재 사용하는 버전입니다.
ls-remote
release 된 전체 버전 목록을 확인할 경우 ls-remote 를 사용합니다.
$ nvm ls-remote

...
 v14.17.3   (LTS: Fermium)
       v14.17.4   (LTS: Fermium)
->     v14.17.5   (Latest LTS: Fermium)
        v15.0.0
        v15.0.1
...너무 많은 목록이 표시되므로 lts(Long Term Support) 버전만 출력하고 싶을 경우 --lts 옵션을 추가합니다.
$ nvm ls-remote --ltsVersion 관리
새로운 버전 설치
nvm install version현재 LTS 인 14.17.3 을 설치하려면 아래 명령어를 실행합니다.
nvm install 14.17.3major 버전의 최신 버전을 설치하려면 minor 와 patch version 을 생략하면 되며 다음은 14.x 의 최신 버전을 설치합니다.
nvm install 1410.x 와 8.x 의 마지막 버전을 설치하려면 다음 명령을 실행합니다.
nvm install 10
nvm install 8사용할 버전 지정
만약 특정 버전을 사용할 경우 use 옵션뒤에 사용할 버전을 지정합니다. 아래 명령은 14.17.3 을 사용하도록 설정합니다.
nvm use 14.17.3minor 와 patch 버전을 생략하면 minor 의 가장 최신 버전을 사용합니다. 다음 명령은 nvm use 14.17.3 과 동일한 결과를 가져옵니다.
nvm use 14다시 nvm ls 를 실행하면 현재 버전이 변경된 것을 확인할 수 있습니다.